Tuesday, March 6, 2012

The difference is in the details:

Since this blog is primarily about shooting stock photography, I thought it would be interesting to include these two very simple images from my most recent stock shoot because they illustrate the really subtle, but extremely important difference between a successful and unsuccessful stock photo.

Many of the best selling stock photo lifestyle situations are oftem very humble events, such as the one depicted here.  It was shot with models in a kitchen scene created in my studio.  Infusing everyday domestic scenes such as this with a feeling of spontaneity, and action is not always easy. The concept of family values in this simple domestic scene centers on the relationship of a mother and daughter working together.  The goal is to tell a simple story without going over board -- one that still maintains the believability of the scene.

On the surface these two photos look very similar.  There are, however, a few differences between them that will make a huge difference later in terms of  their marketability.  This is a simple kitchen scene showing a casual, everyday relationship between the mother and daughter.  Above the models are smiling at each other, but their basic body language is static and they look posed.  The mother is standing upright and holding the utensil but not performing any action with it.  The daughter's position of holding the colander is similarly static and unnatural.  The scene looks uncomfortable, false, and posed -- which, of course, it is.
In this variation I made a few small changes.  I asked the model playing the mother to hold the knife as if she was about to make a cut in the potato and then to shoot a glance to her daughter.  This shifted her body into a more flattering curved position and gave a little dynamism to her pose.  I asked the daughter to repeat a motion of  picking up a potato from the counter and putting it in the colander.  At the same time, I asked them both to maintain eye contact and gave them something to say that parted their mouths as if they were really having a natural and pleasant conversation, and not just smiling at each other.  Simple and subtle they may be, but these differences translate into a stock shot with a more spontaneous and natural feel to it,

Follow up:

One of the comments to this blog entry thought that the first shot made a better stock image than the one I had chosen.  Truth is, sometimes when editing a shoot the variations are very similar.  That, in fact, is one of the points I was trying to make.  The image you choose can make all the difference between the financial success or failure of a shooting.

Because I had some doubts myself, I decided to submit the eight photos from this situation to someone who could provide a second opinion.  I asked a person who has been a creative director in stock photography with over twenty years of experience and who has worked for the top traditional stock agencies.  Here are the eight photos and the editor's comment:


"I would pick 8. The eye contact and connection between the models seems genuine and the shot is about a kid helping and the body language and position of the kids hand on potato looks like a convincing moment" 

Number 8 is the image I had selected so I feel good about the fact we both came to the same conclusion for the exact same reason..  But if you look at the images I submitted you will realize that they are extremely close.  The point I am trying to make here is that the difference between success and failure in a lifestyle stock image can be very subtle. 

Creating a successful lifestyle photo is a lot like making a movie in microcosm.  The photographer must assume the role as script writer, director, casting director, and, less I forget, photographer too.


Sunday, November 21, 2010

The Daily Stock Shot Project

I started a second stock photography blog called, "The Daily Stock Shot Project".  In it I will be taking one stock photo a day for a year and posting them to the blog.  The idea is to produce images that are out of my main-stream work -- grab shots mostly, shots that I would not have taken otherwise.  I have limited myself to a low-budget or no-budget to keep the effort simple and within the reach of anyone with nothing more to spend than a good conceptual imagination.

Here  to some recent additions.  For more, visit the blog at: http://dailystockshot.blogspot.com/


Saturday, September 18, 2010

Review of the Nikon 28-300mm zoom lens -- A case of wishful thinking

Like many FX Nikon users, I eagerly awaited the arrival of the new AF-S Nikkor 28-300mm f/3.5-5.6G ED VR Zoom lens.  What was there not to like?  The specs were great -- a full range zoom, moderately fast lens opening, small size (only 4.5" long and 28.2oz), an ability to focus as close as 18" over the entire zoom range, VRII motion control, and some ED and aspherical lens elements.  At $1050 this looked to be an ideal lens for those times when you wanted to lighten your load and carry only one body, like maybe the D700, and one lens. The higher price even encouraged me in my thinking.  I  figured that Nikon would only put out a high quality lens in the over $1k price range.  When I unpacked the lens, its heft and feel reenforced my positive anticipation.  So I mounted it on a D700 and went about my standard tests for lens quality -- and that is when my bubble burst.
 Note how the bricks bow outward at the center of the edges but
then come back in and out again towards the corners.
This type of distortion is very difficult to correct.

First thing I did was run the lens through my standard brick wall test.  You can see some of the results in the images above.  Rectilinear distortion is very apparent at the extreme focal lengths.  If it were only pincushion and barrel distortion it would not be so bad, as both are easily corrected in post-processing, but at 28mm the images showed high pincushion distortion in the middle of the frame edges plus barrel distortion as the lines approached the corners.  This type of distortion is almost impossible to correct fully.  Vignetting was significant at the shorter focal lengths, but this is easily fixed in post-processing.  Substantial chromatic distortion came into play at all focal lengths. The corners are noticeably soft at all focal lengths.  To top it off, the images had an overall soft quality, and never even approached the crisp sharpness of the professional Nikkor zooms like the 24-70mm, and 70-200mm.
 34mm length at f/8 1/1000 sec, ISO 400  Click here to see full res image
 150mm f/11 1/400 sec, ISO 400   Click here to see full res image
An advantage to this focal length zoom is that you can quickly
switch from close to distant views of the same subject.
The good news is that some of the distortion can be corrected in post-processing.  Photoshop does not yet have a plug-in for this lens, but I was able to cancel the chromatic distortion, eliminate the vignetting,  and correct the rectilinear distortion in all except the most extreme wide angle focal lengths.  Unfortunately, softness is not something that is correctable so the images maintained their overall mushy quality.  Even stopping down to f/8 didn't significantly improve the softness.   If you limit the lens to a zoom range of 35-200mm the results are better.
  82mm f/5.6 1/160 sec, ISO 800   Click here to see high res image
I debated whether I would keep this lens despite its aberrations -- limiting my use to those circumstances where I would really only carry a camera  if it were this small.  I figured that having even a mediocre system was better than having no system with me.  Ultimately, I realized I would not opt for this choice if there was even a slight chance of obtaining a usable professional image by carrying the camera around.  So that limited my use of this lens to personal shooting of the "home snapshot" variety.  As a result of my tests, I would not use this lens for serious stock photography, where images need to be 50mb in size and distortion-free.
 250mm f/8 1/1250 sec, ISO 400   Click here to see high res image
Note how the building is not sharp and softness increases towards the frame edge.
Bokeh was not very pleasant, but I won't hold that against a lens with a maximum opening of f/3.5-5.6.   If you plan on using this lens with a pop-up flash, remove the lens hood as it will cast a shadow at even the shortest focal length.    
 116mm f/8 1/800sec,  ISO 400   The lens will focus down to 18" at all focal lengths.
The holy grail of zoom lenses has always been one that could be hand-held,  with a focal length range from very wide to extra long telephoto, and close-focus ability.  The specs of this lens fill that bill but not without substantial compromise in image quality.  The quest for the holy grail will have to continue as an unattained dream. 

Sunday, July 18, 2010

Testing the new Leica f/1.4 35mm Summilux-M ASPH lens


The latest M-lens release from Leica is an update of its famous 35mm 1.4 Summilux-M ASPH.  Since this is a lens known for its sharpness, I concentrated my tests on architectural subjects with plenty of detail.  My results show that this may be the sharpest lens ever made by Leica, and is, perhaps, the sharpest camera lens of all time.  Although similar in design to its predecessor, this version has a floating element, and improved close focus.


Architectural subjects show remarkable detail (click here to download hi res image).

The Achilles heal of wide angle lens on full frame digital cameras is in the corners of the frame where the image is often soft unless the lens is stopped down to f/5.6 or more. Typically, these shorter focal lengths are also prone to vignetting and barrel distortion, but these aberrations are easily corrected in post-processing. My brick wall test on a full-frame Leica M9 showed some corner softness at f/1.4, less but still present at f2. but almost disappearing at f/2.8 -- all in all, very acceptable for a wide angle lens.  At f/1.4 the brick wall test showed minimal vignetting, which disappeared when stopped down to f/2 and beyond.

Wide open at 1.4 the Summilux has a pleasing bokeh.


The beauty of a 1.4 lens is shooting hand held at night.

Conclusion:  Leica continues to improve its lenses for the greater demands of digital cameras while maintaining quality considerations for its older film M bodies.  Other manufacturers often allow barrel and pincushion distortion along with vignetting in newer digital lenses on the theory that this is readily correctable with digital post-processing. Leica still has a loyal film camera user base where these corrections are not easily made.  

Bottom line is that this is the sharpest lens I have ever used.  Couple that with the high speed f/1.4 diaphragm and you have a real winner.

Monday, June 7, 2010

Searching for a pro’s version of the point-and-shoot camera

I am frequently asked to suggest a camera pros can carry around as a point-and-shoot that can deliver acceptable quality for submitting to traditional stock agencies.  Until recently, such a camera did not exist.  They were too bulky to qualify as pocket portable, or the quality was really point-and-shoot and totally unacceptable.  Many of my pro friends tried the Canon G11 because it looked the part of a professional camera,  Unfortunately, this camera really is just a glorified point-and-shoot on the inside with a minuscule-sized sensor -- the same one Canon has in its S90.  Most of my friends passed their G11’s on to their wives or kids. 
Recently, a new crop of small cameras have hit the market.  Olympus and Panasonic introduced their Micro Four Thirds series with sensors that are about half the size of a 35mm full frame.  Leica just came out with the X1.  It has an APS-C sized  that is the same size as found in many pro-level cameras, and is two thirds the size of full frame 35mm.  In digital photography sensor size may not be everything, but it is definitely one of the most determining factors in image quality.
I performed extensive tests with this new crop of cameras and this blog entry is the result.


 Leica X1 – following in a great tradition


The X1 and an original Leica 1 of 1930.


The first thing that surprised me when I picked up the X1 is how small and light weight it is.  It has one fixed lens, a Leitz 24mm f/2.8 Elmarit Aspherical.  This is equivalent to about a 36mm lens on a 35mm full frame camera.  The sensor is a 12.2MP CMOS (23.6mm x 15.8mm), similar to that found in pro level cameras like the Nikon D300s.  The display is 2.7” and easy to see in sunlight, although most pros would probably prefer to use the auxiliary viewfinder available for  this camera.
With the battery in it the X1 weighs in at 11.8 oz., which is truly point-and-shoot size.  It was the lightest camera of all those I tested and lighter even than the G11.

Leica X1 with 24mm Elmarit lens

The X1 uses one SD/SDHC card and was indicating 94 images in RAW (DNG) plus fine JPG on a 2GB card.  The battery is capable of 260 exposures on a 200 minute charge.  The flash is a pop-up with a range of 7’ at ISO 100, however the hot shoe is compatible with the Leica SF24D and SF58 flashes. 
ISO
The ISO range is rated at 100-3200, and this is one of the few cameras I have found able to justify this claim.  I was stunned at the high image quality produced at ISO 3200.  Not only was the noise level low, it had a quality reminiscent of film grain – really beautiful.  Like to shoot at high ISO ranges?  Not a problem, this is the camera to use.

Download Hi Res ISO test photos
ISO 100   ISO 400   ISO 800   ISO 1600   ISO 3200


Controls
Simplicity of use is the name of the game here.  There are two dials on top of the camera.  One controls shutter speed, the other handles lens openings.  Put them both on “A” and the camera is essentially in “Program” mode.  Change the shutter speed dial while the lens opening dial is on “A” and you are in shutter priority mode.  Change the lens opening dial while the shutter speed dial in on “A” and you are in aperture priority mode.  Change both dials and you are in manual mode.  Absolute simplicity.  I don’t know why no one ever thought of this before.
The motor drive is 3fps in jpg and 2fps in DNG with a burst of 6 images.


Image Quality
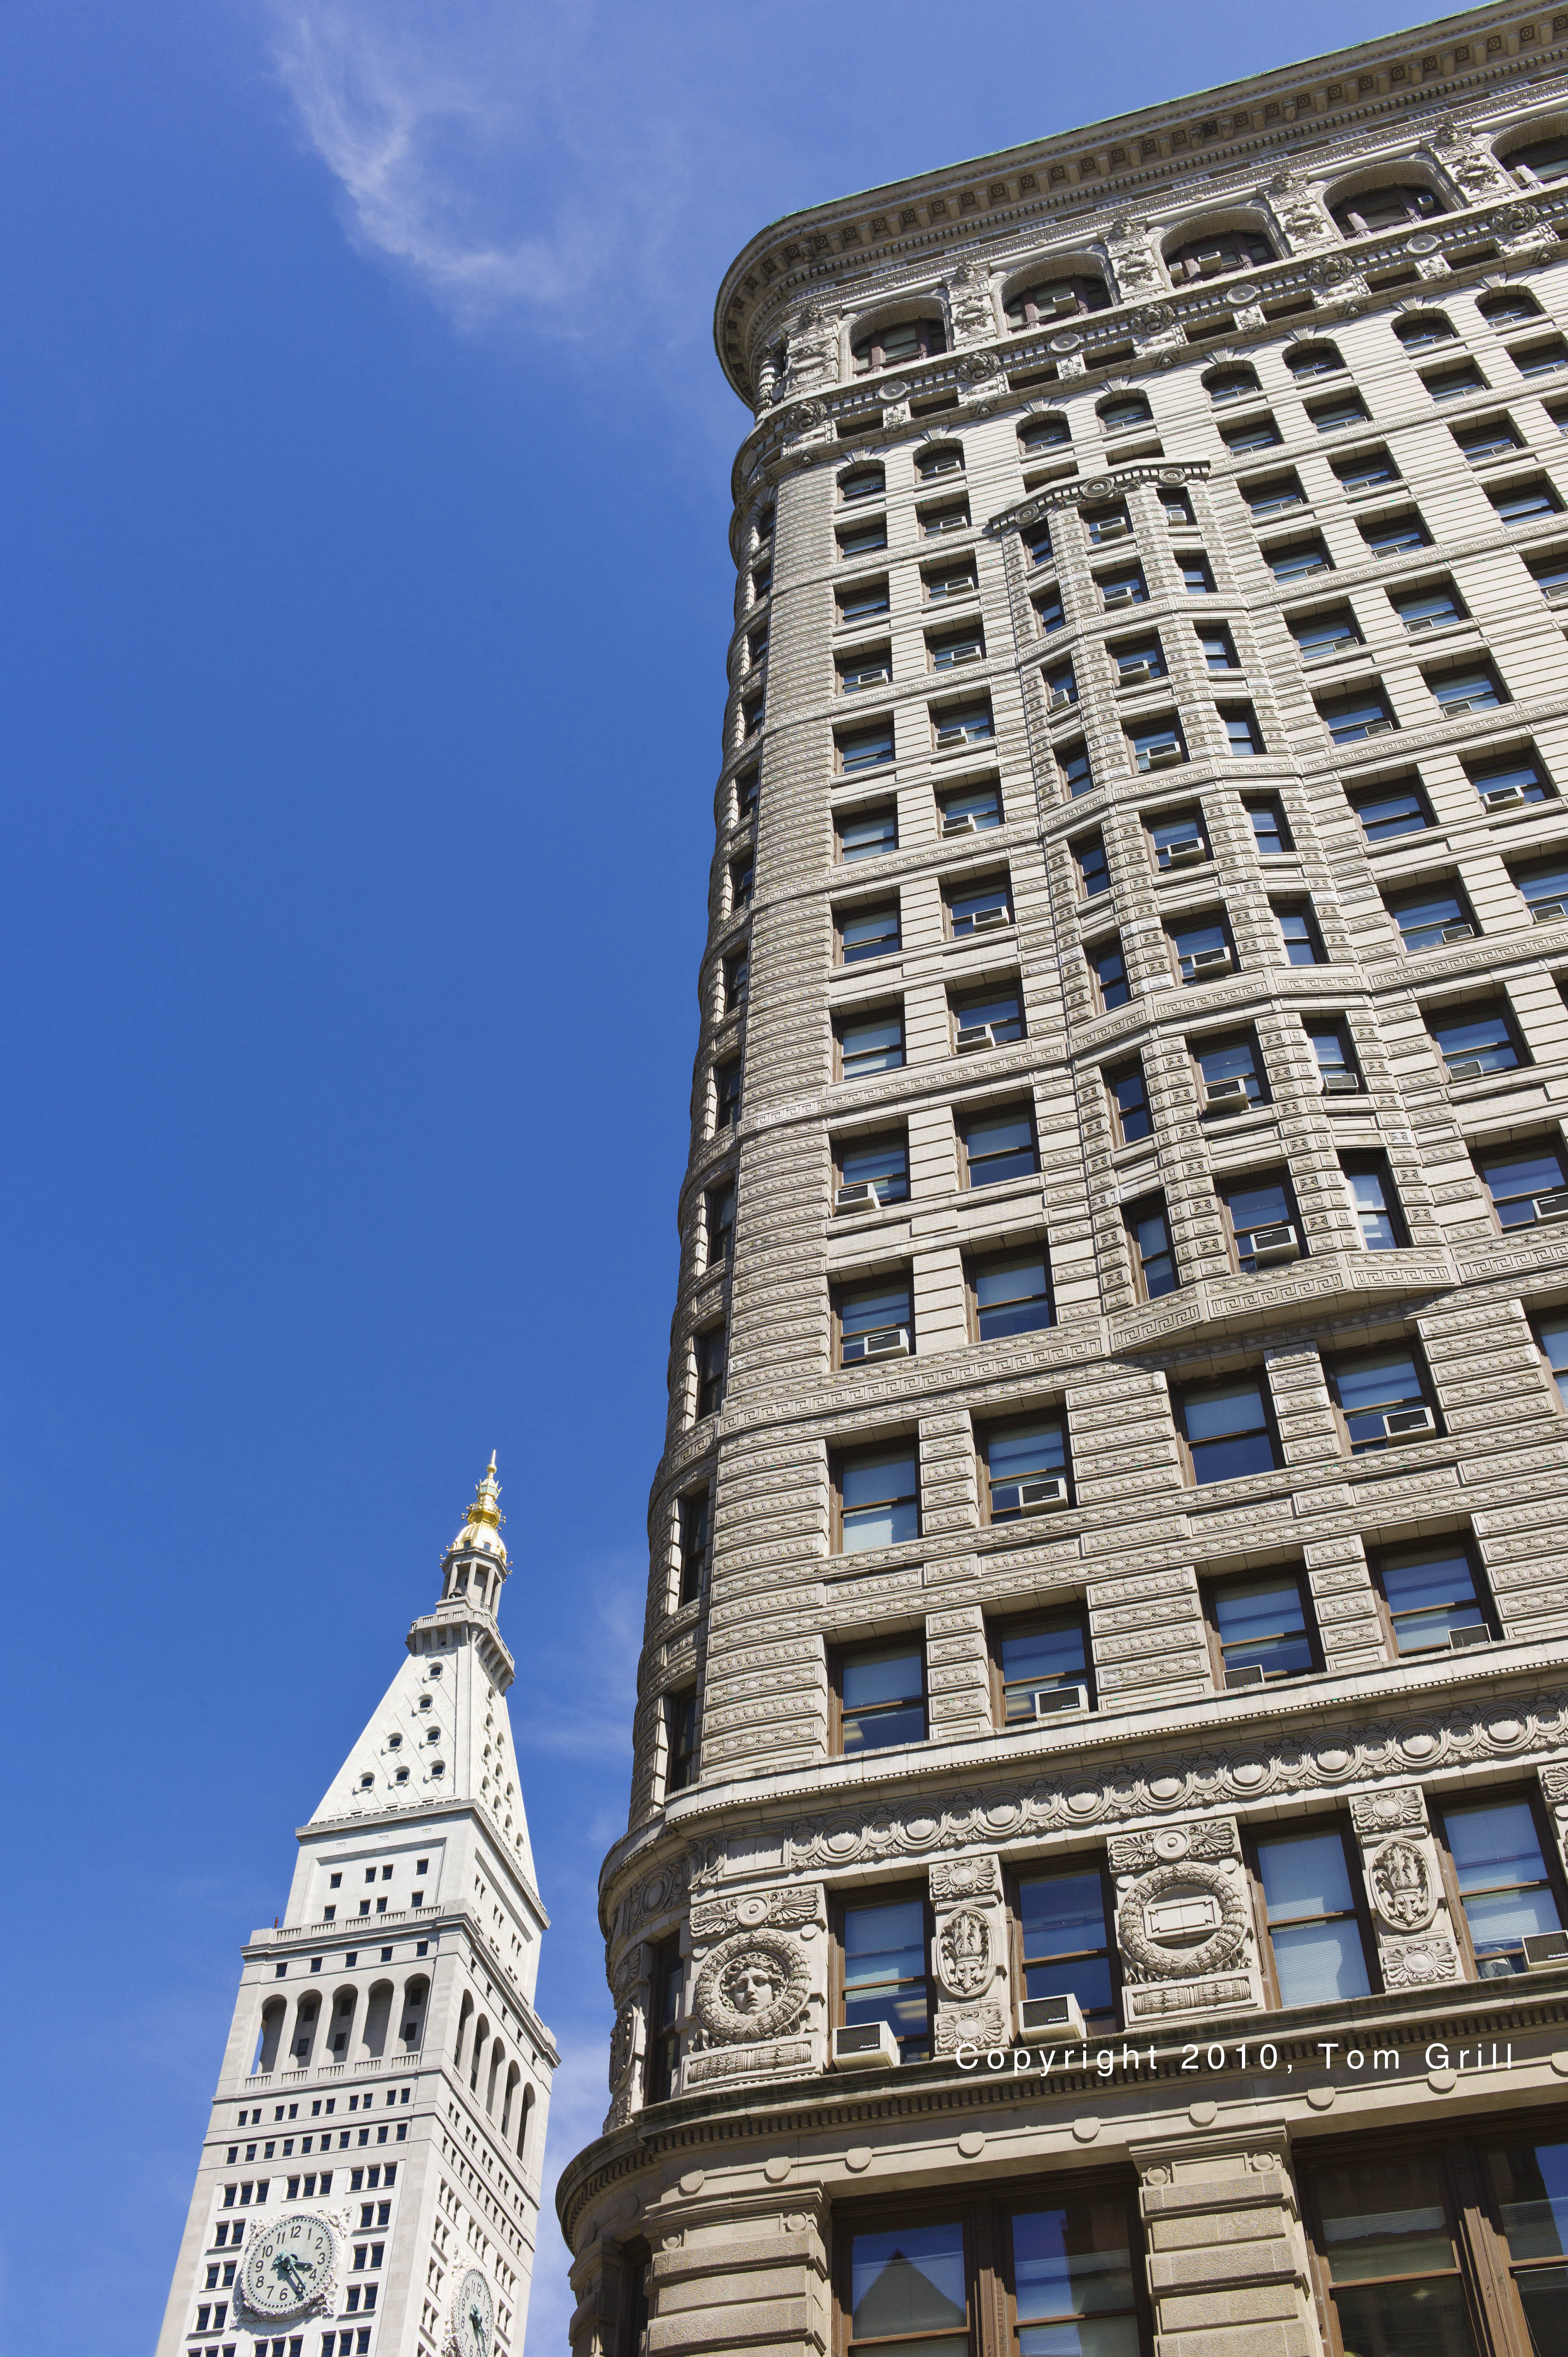
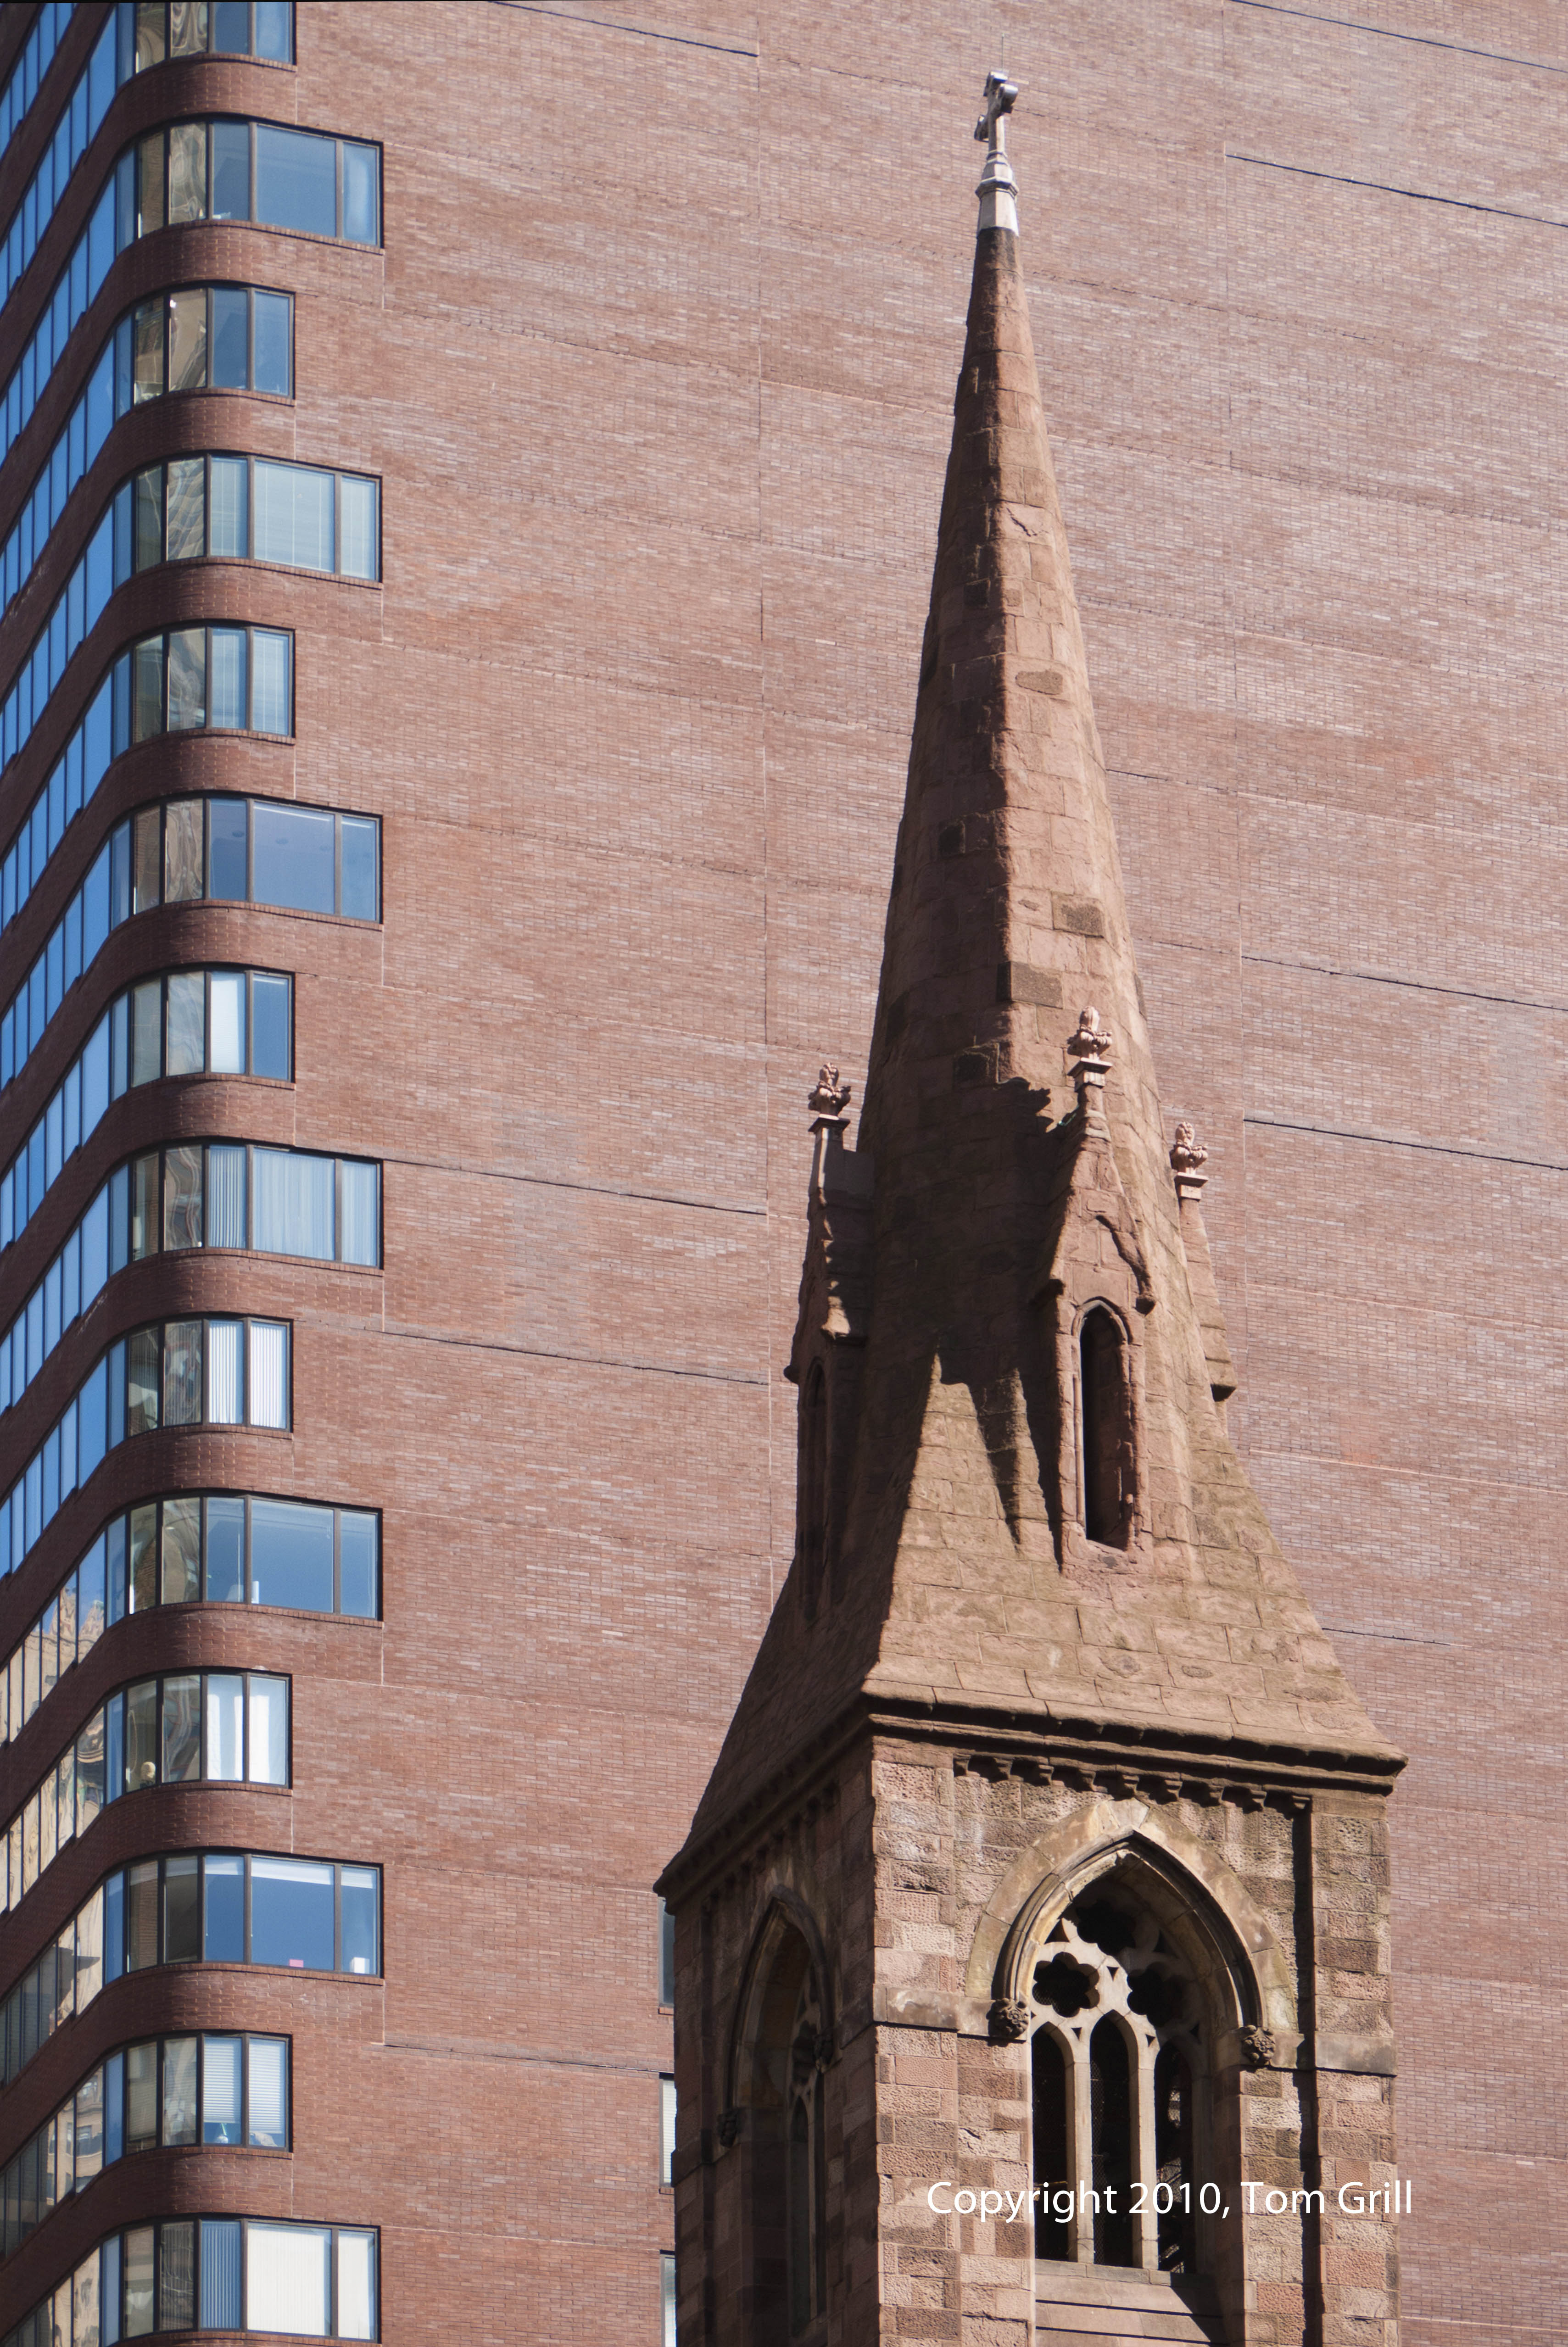
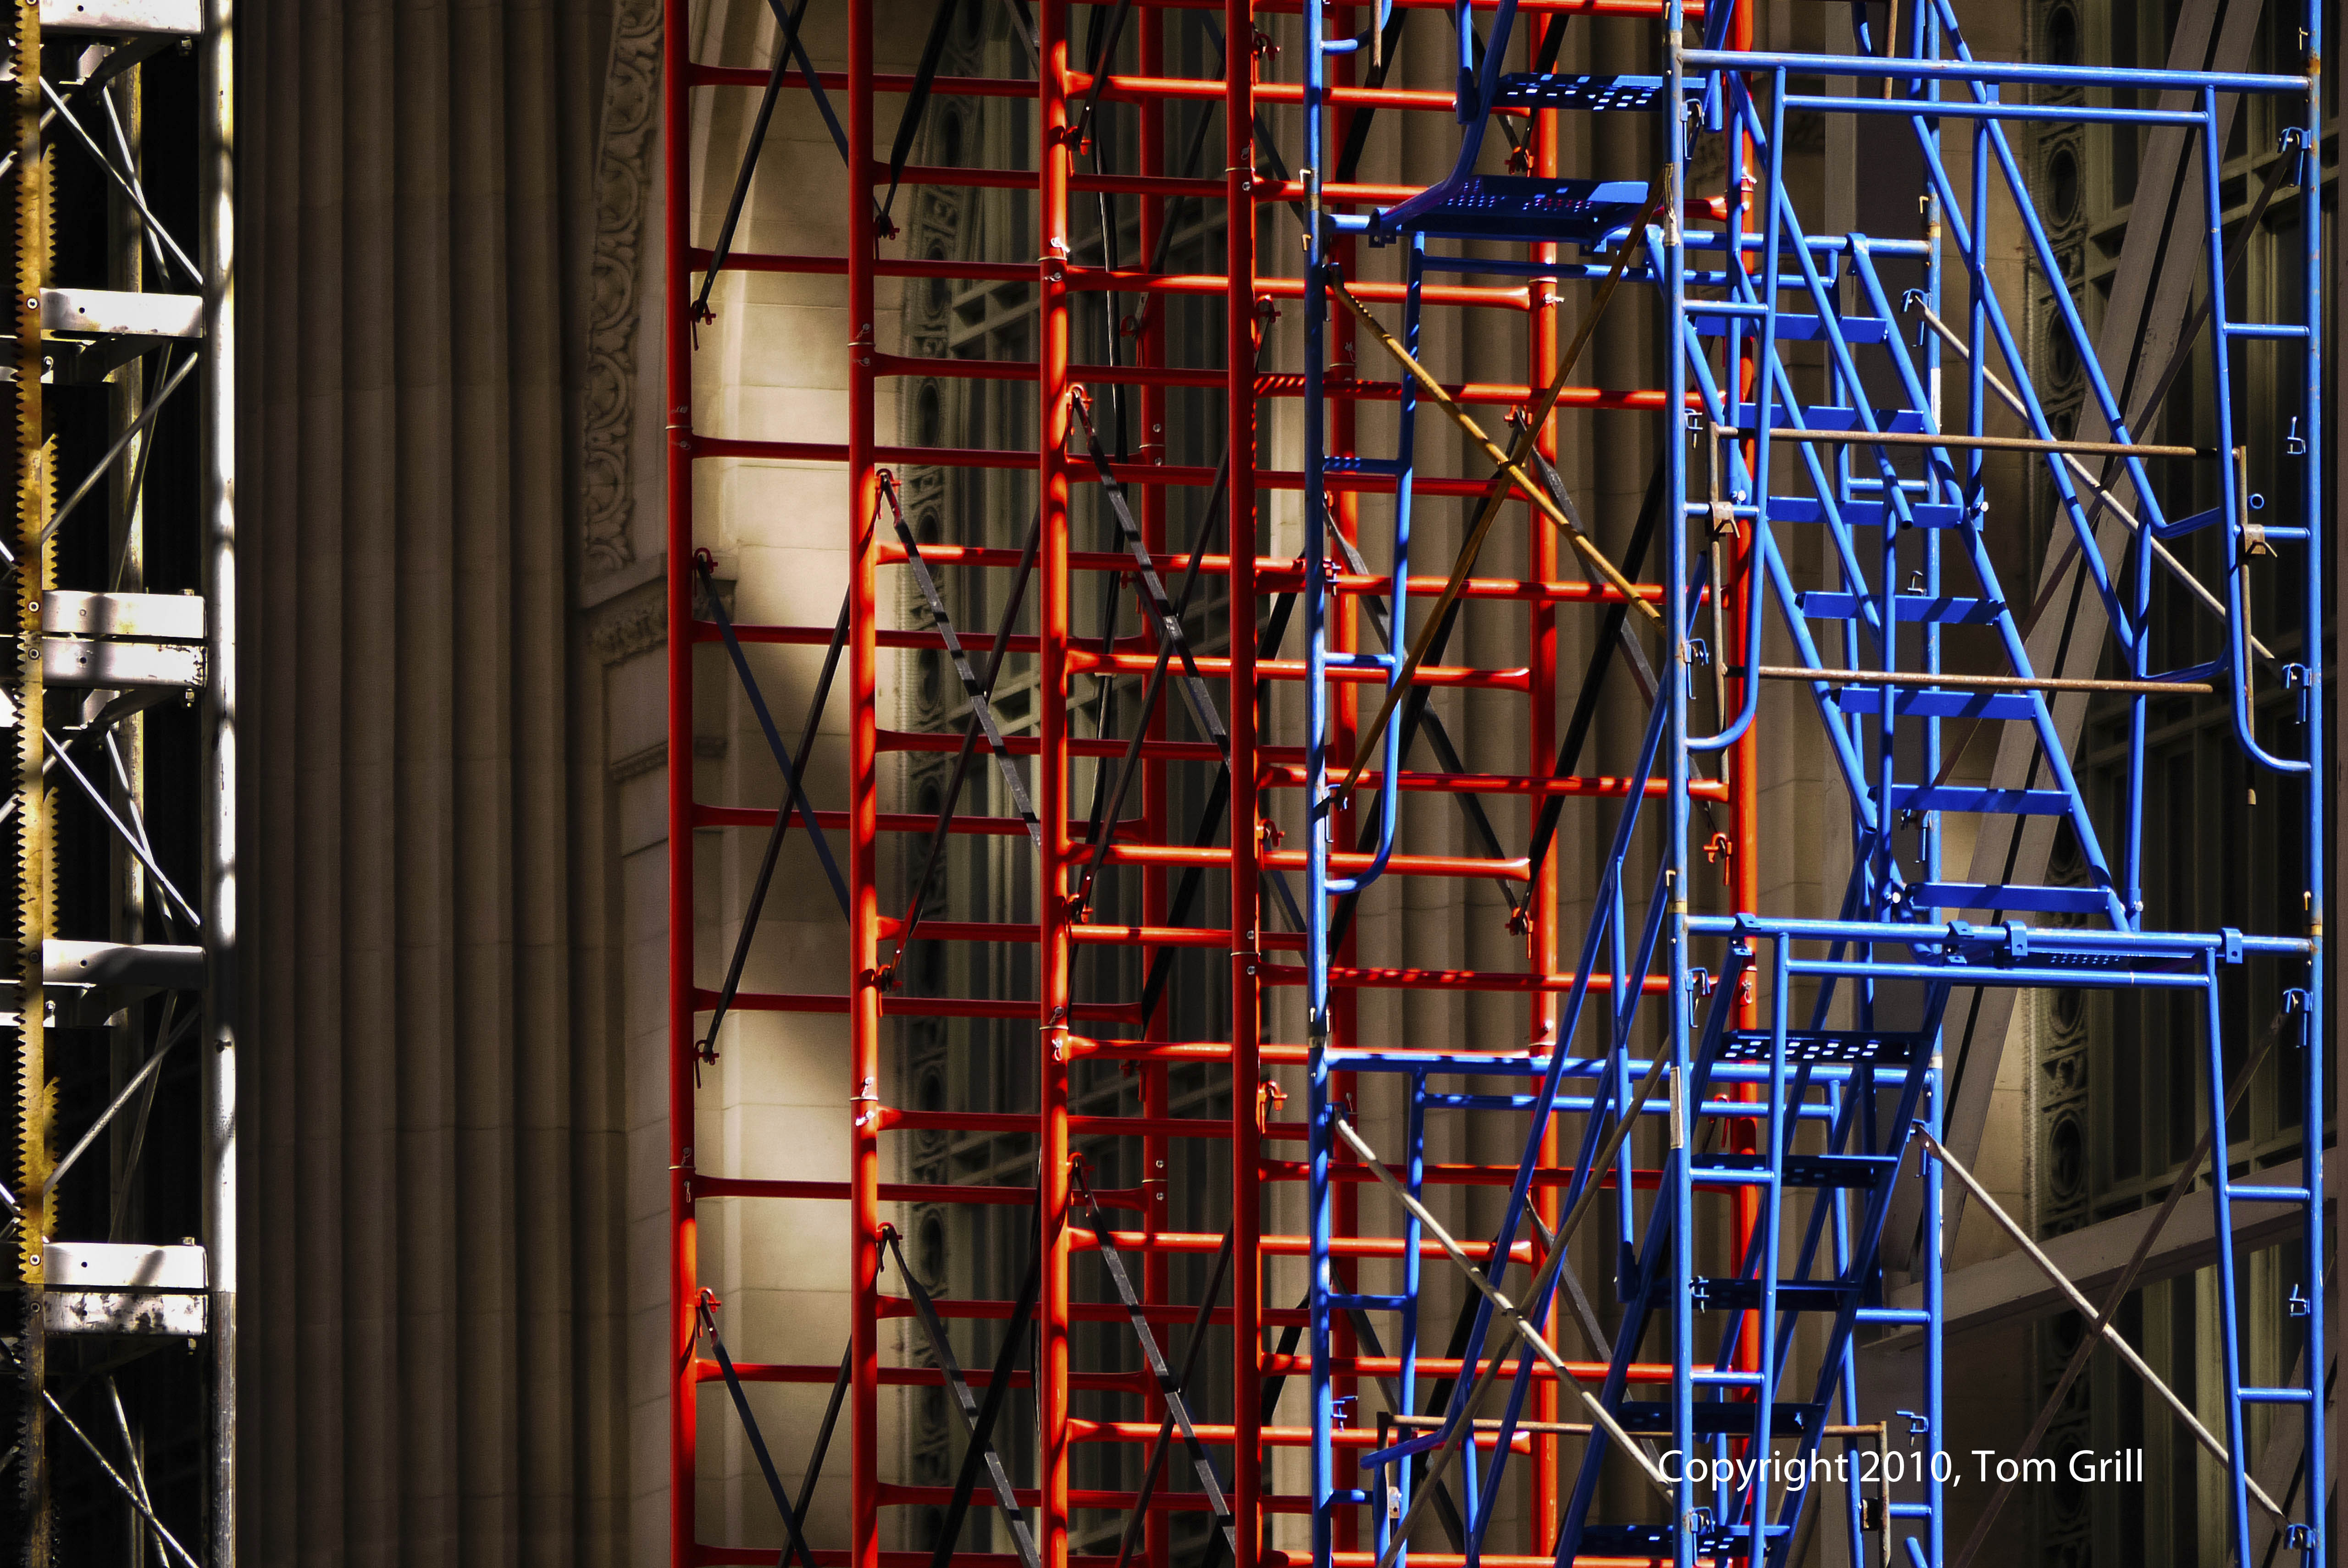
The quality is what you might expect from a high grade digital camera from Leica – in a word: “Excellent”.  The images from this camera already fit the standards for commercial stock photography.  You don’t have to massage them.  They meet the highest criteria right out of the camera with no special post-processing necessary.  Take a look at the detail in the Hi Res versions of the sample images below.  It really is on a par with what you would expect from a professional camera.


Conclusion
About the only thing this camera has in common with a point-and-shoot is size and weight.  In all other respects this is a professional grade digital camera capable of delivering image quality on a level with the best DSLR cameras out there. 
The only drawback of the X1 may be that it has only one fixed lens.  On the plus side, that lens is a superb Leitz Elmarit with no distortion.  On larger sensors it is difficult to keep lens size within bounds of a point-and-shoot size – and there is the trade off. If you want to add a zoom lens to a large sensor camera, you wind up with something that no longer fits in your pocket.


At $1995 it is an expensive camera, but image quality of this type doesn’t come cheap.  It is the only camera available at this quality level that actually does fit in your pocket.  With all three test cameras available to me I found it was the X1 that I grabbed when I was going out for a walk.
The Leica X1 delivers professional stock images right out of the box, even in low light situations

 Leica X1 with 24mm Elmarit lens
Download Hi Res version of this image


Panasonic DMC-GF1 and Olympus E-P1


I tested these cameras together because their development was in tandem and they come from a similar mold.  Together, Panasonic and Olympus developed the Micro Four Thirds format, and have the same, interchangeable lens system.  Sensor size is about half of a 35mm frame, which, as digital sensors go, should be large enough to produce professional quality images.  Both cameras come in at a little above 12MP.

Olympus E-P1 14-42mm zoom at 14mm
Download Hi Res version of this image
The only way these cameras can truly fall into a point-and-shoot category is if you only use the  pancake lenses available.  That would be the 17mm f.2.8 on the Olympus, and the 20mm f/1.7 lens on the Panasonic GF1.  Once you add any other lens, the cameras bulk up to a point where they will no longer fit in a pocket.

 Panasonic GF1 45-200mm zoom at 56mm
Download Hi Res version of this image
On the other hand, the extensive lens assortment available for these cameras make them attractive as small systems.  I did test a number of the regular zooms made for these cameras.  I found the resolution of these lenses to be a bit on the softer side when compared to a professional quality DLSR lens. Nonetheless, they are acceptable as you can see by downloading the Hi Res images above.

ISO range

The rated ISO range of the Panasonic GF1 is 100-3200, and 100-6400 on the Olympus E-P1.  As far my tests go, these are very optimistic claims.  I think the GF1 can produce usable images up to ISO 1000, while the E-P1 could go to a maximum of 1600.  Beyond that and the images are too noisy to be acceptable by commercial stock photography standards and are beyond the range for acceptable correction by noise lowering software.


Download Hi Res ISO test images of the Olympus E-P1:


Download Hi Res ISO test images of the Panasonic GF1:

Controls and features

The controls and menus of these cameras are full of options and pre-packaged shooting modes, all of which leads to complexity in handling.  Expect to carry around the user manual with each of them.

Situations with people are difficult to focus accurately with this type camera because you cannot put a pinpoint focus spot on the subject's eyes.  (E-P1 42mm lens)  Download Hi Res image here.

Both cameras shoot at a respectable rate of 3fps, and both have a generous 3” LCD screen for viewing in live mode.  They also both shoot video, but that is beyond the scope of this review.

Travel scenes iare the most suitable venue for achieving good results. (GF1 45-200mm zoom) Download Hi Res image here.


Image Quality

The images from these cameras would be acceptable in terms of commercial stock standards with a few caveat.  ISO noise levels are excessive and need to be carefully treated anywhere above ISO 800.  Images are generally not as sharp as you would achieve with a pro lever DSLR.  They are a tad soft – mostly acceptable, but definitely a bit soft when using the manufacturers lenses.  Keep in mind that with adapters you could use other lenses, even Leica lenses on the Micro Four Thirds cameras, but that is not a convenient option when all things are considered.

Olympus E-P1 with 14-42mm zoom
Download Hi Res image here.


Accessories

A separate SLR-type viewfinder is available for both cameras, however this does increase the camera size considerably.  The Olympus does not have a built-in flash so it will need the optional flash – yet another thing to bulk up the overall camera kit.

 Panasonic Lumix GMC-GF1 with 45.200mm zoom. 
Download Hi Res image here.
 
The list of available lenses for these cameras continues to grow, and may be one of their more attractive features.   Adapters are also available for using other manufacturers lenses on these cameras.  In this case auto-focus and auto-exposure may no longer be available.


Conclusion

Initially, I had expected that the Micro Four Thirds format would be the perfect solution to a convenient camera to have with me at all times for those spur of the moment shots.  After testing the cameras, however, my enthusiasm waned.  I found the cameras too bulky once zoom lenses and accessory viewfinders were added.  More importantly, the image quality was disappointing. It required careful post-processing to deliver acceptable stock photos.

 Olympus E-P1 with 14-42mm zoom. 
Download Hi Res image here.

Bottom line is that these Micro Four Thirds cameras in the hands of a professional photographer are capable of delivering the goods.  My recommendation would be to keep ISO levels on the low side (below 800) whenever possible.   I would also refrain from cropping too much because the images are just not as sharp enough to handle it.  While not as good as a pro level DSLR, these cameras are capable of producing acceptable images for traditional commercial stock photography. 

Panasonic Lumix DMC-GF1 with 45-200mm zoom. 
Download Hi Res image here.

While you are probably not going to stick one of these cameras in your pocket, you can put together a small, convenient kit to carry around in a bag for shooting travel images on the go.

Tuesday, May 25, 2010

Field testing the Leica M9


 The first Leica I used professionally was the M2.  I still have it along with its original lenses, all of which I continue to use. Shooting with a Leica camera is an exhilarating, tactile experience akin to driving a fine-tuned, pedigreed sports car with a manual gearbox.  You really have to know how to handle your vehicle in order to coax the maximum performance from it.  
  
My favorite M Leica was the M4.  I have a black lacquer model with a Leica modification to the viewfinder so that it has six frame lines of 28/35/50/75/90/135 -- the same frame lines that have appeared in every Leica from the M6 to the M9.  It's black lacquer finish is brassing slightly, but otherwise it bears a striking resemblance to the new M9.

For those of us who have used Leica M film cameras for years, the advent of a full frame digital M body has been eagerly awaited.  The M9 will not disappoint.  When combined with the legendary sharpness of Leitz lenses, it may just be the highest quality digital camera ever produced. 

 Leica M9 with the first Leica, a Leica I behind it


Why Leica?

Many of my friends who shoot commercial stock have wondered why anyone would want a manual focus rangefinder camera in the easy-to-use DSLR era. I have to admit I gave this some thought myself.  I have been using the Nikon D3s, D3x cameras with their super-fast and sharp auto-focus zoom lenses ranging from 14mm to 400mm.  This is a convenient system that is hard to beat, particularly when shooting fast moving subjects.  But as stock photographers we do not all shoot the same subject matter.  Stock photo subject categories are myriad: lifestyle, travel, scenic, still life, architecture, animals, sports, etc.  Each of these areas requires its own optimal camera equipment requirements.  I produce stock in all these areas and more, and I try to optimize my output by using the most suitable equipment for each specific task.  

28mm Summicron, right into the sun -- a tough shot for any camera

The question becomes: What are the stock situations where this camera excels?  My first surprise was the manual focus.  I expected this to slow me down quite a bit and result in many soft images.  Instead the split-image rangefinder made it easy to pinpoint an exact focus.  I’ve become used to DSLR cameras with their tiny box-like focus spots.  But these are not always accurately placed, particularly on a model’s backlit face where you want the eye to be in perfect focus.  The split-image focus of the M9 allows you to choose an exact placement of the focus spot.  Couple that to the incredible sharpness of Leitz lenses aspheric lenses and the result is a super-sharp image.

 Panorama created in CS5 with two 35mm images from the M9

When I first took a RAW image for the M9 up to 100% on my 30” monitor I was blown away by its incredible sharpness and detail.  Frankly, I had never seen any camera as sharp as this.  A lot has to do with the Leitz lenses, of course.  Take a look at the hi res image of New York city at sunset.  I have shot this scene many times, but never have I seen anything this sharp.  In the original file I can clearly see the details inside office building windows.

click here to view a full resolution version of this image


The sensor in the M9 is a full frame (24x36) Kodak CCD with 18.5MP.  Kodak has been making digital sensors for quite some time.  They are of very high quality. 

Producing a full-frame sensor for a Leica is particularly problematic because Leica lenses work much closer to the film plane than do SLR lenses which have a mirror to distance them. This sensor solves the lens proximity problem of non-DSLR lenses by incorporating a microlens technology on the sensor itself.  ISO sensitivity range has been improved from the M8 and is rated at 80-2500 with 160 as the base. 

Lenses

A big question I had  for the M9 was how wide angle lenses would perform in the corners of the frame.  Super wide angle lenses have been the Achilles heel of full-frame digital sensors.  Most of the wide angle lenses I tried did produce some soft corners at wide open apertures.  This disappeared, however, when the lenses were stopped down to f/5.6 or more.  Nonetheless, this is an area Leitz will need to address in future lens designs.  It is especially important for Leica because photographers are attracted to the faster f/1.4 and f/2 speed of the Summilux and Summicrons and like to use these lenses wide open.

One of the thing I like about Leitz lenses is their ability to shoot straight into the sun and produce a dramatic star effect .  - 50mm Summicron

New lenses for the Leica are digitally coded so the camera knows what lens it has and can make some in-camera corrections.  The M9 will retro fit almost all older Leica lenses made since 1954.  You can send them to Leitz to have the coding added.  Coding supplies the image processor with lens information so it can make specific corrections for vignetting and other aberrations.  It also passes the lens information along to the EXIF data in the digital image file. 

 Dublin at dusk - 28mm with the Leica M9

All Leitz lenses I tested on the M9 showed a remarkable lack of vignetting and rectilinear lens distortions. The images were clear and bright with exceptionally high resolution.  Take a look at the samples I am showing here.  Many were shot directly into the sun, and yet there is plenty of detail and contrast in the foreground subjects. 

Menu

The menu system on the M9 is simple – thank goodness. There is one menu page with everything listed out. In addition, there is an ISO button for quick changes.  Under this is an Info button that calls up an on screen display of important information.  Battery condition and SD card capacity are shown graphically in large bar graphs, while image count, shutter speed, and lens are listed below – simple, quick, and to the point.  

New Orleans, 90mm lens

With the multi-menu professional DSLR cameras I have to carry around a manual the size of a phone book just to keep track of the menus.  With the Leica it’s all intuitive.

ISO

Nominally the M9 has a top ISO of 2500.  I would recommend not going over 1250.  Keep in mind this review is for commercial stock shooters whose images must be of very high quality at a 50MB size.  Editorial shooters do not have the same restrictions. 

Of course using fast aperture Leitz lenses has an advantage over most DSLR zoom lenses that top out at f/2.8.  Using a f/1.4 or f/2 aperture has the same result as doubling or quadrupling the ISO.  Even better, it provides the extra sensitivity without the extra noise.  Using a DSLR at 6400 ISO while at f/2.8 would be the equivalent of using a 1600 ISO on the M9 at f/1.4.

Viewfinder accuracy

135mm f/3.4 APO Telyt, ISO 1000 - download hi res here

Camera lenses actually change their effective focal length as they are focused from infinity to close-up.  As a result, rangefinder viewfinders can only be accurate for a specific distance.  The M9 has its viewfinders frames set for a 1 meter distance.  This means that at 1 meter you will have an accurate representation of what the lens will take.  At infinity, however, the lens will include more than what you see in the viewfinder.  A 90mm lenses focused at infinity is actually taking a photo that is closer to what you would see with an 85mm finder than with the 90mm frame.  I’ve been using an old Leica 85mm viewfinder for the Summarex lens and it is a very accurate representation of what my 90mm Elmarit sees when it is focused at infinity.

Strongly back lit subject in natural daylight, shot with a 90mm Elmarit


It would be nice if Leica would make a variable focal length “Infinity Viewfinder” for those of us who like to compose tightly.  Such a finder would not even need parallax correction since it would only be needed for framing at infinity.  This would be especially helpful to travel photographers who shoot at infinity quite a bit.

Portability


My most compact travel outfit, the M9 with a Tri-Elmar 35-50-38mm lens and 90mm.

The Leica M9 is the world’s smallest full-frame camera.  It weighs in at 19.8 ounces (585 grams) with its battery.  By comparison a Nikon D3s weighs 44 oz (1240 grams) and a Canon 1Ds is 42.7 oz (1210 grams).  While a Canon 5D of Nikon D700 are lighter at 28.6 (810g) and 35.09 oz (995g), respectively, they still have to use much heavier lenses. My entire Leica M9 with a full assortment of lenses weighs less than the most popular Nikon or Canon zooms alone.  

 The dynamic range of the M9 is extensive.  Download the hi res sample to see
how it holds detail from the deepest shadows to the bright highlights.

Admittedly, this feature becomes more important to me as I get older.  I do find that I am more inclined to carry the M9 around when I would have left my bulky DSLR at home  The result has been that I have been picking up a lot of extra stock shots I would have otherwise missed.
I have two M9 “kits” that I use.  For ultra-portability I carry the M9 with a Tri-Elmar 35-50-28mm, and an Elmarit 90mm.  I don’t usually need a camera bag for this because I stick a lens or two along with a polarizer in my vest.


When I am seriously covering a travel location I have either a 21mm or 24mm lens along with a 35mm, 50mm, 90mm, and 135mm.  The discontinued Tri-Elmar is nice for convenience but it does not approach the quality of the Leica primes.  

Another plus to carrying a Leica M9 system is its unobtrusiveness.  It is small and quiet --- very quiet.  You can travel unnoticed.

Controls

Leica cameras are designed to be used instinctively.  You do not have to look at the controls. This is especially true if you have grown up in the Leica tradition, as I have.  You can feel the clicks in changing shutter speed and lens stops, all in half-stop increments.


Conclusion

2008-2010 may represent the time when professional digital cameras hit their stride.  It has taken about ten years to get here – many trial-and-errors, many false starts – but I have a feeling that we can safely say we have “lift off” on a new era of professional digital photography. 
The Leica M9 is a pinnacle of achievement making the transition from analog to digital complete.

In the words of the great Winston Churchill,  "Now is not the end.  It is not even the beginning of the end.  But it is, perhaps, the end of the beginning."

For me, it’s nice to see Leica leading the way, as it has done since the very beginning of 35mm photography.